Vegan Spaghetti Alfredo~No Cashew

Vegan Spaghetti Alfredo~No Cashew @matchamochimoo

Alfredo Sauce is a classic Italian sauce typically made with heavy cream, butter and hard grated cheese like parmesan cheese. It’s a substantial crowd-pleasing sauce that is still beloved.

Another one called White Sauce is a French sauce known as Béchamel sauce. It is made up of a roux (flour and butter), or also fresh cream.

People are often daunted by how to make Alfredo sauce or White sauce. Here I show you an easy, nut-free and dairy-free alternative recipe to a classic Italian dish for first-timer success!

If the sauce seems too thin, just let it simmer for a few more minutes on low heat until it’s as thick as you like. Conversely, if the sauce seems too thick, just whisk in a splash of dairy-free milk, broth, or water to thin it out again. Get it? Add the nutritional yeast flakes to make the sauce with a rich cheesy flavour. Of course, you can use vegan cheese, it is the main ingredient, and it makes a big difference in the tastiness of the finished dish.

Make-ahead Alfredo Sauce can be made ready in less than 10 minutes. Or keep for a week in the fridge until you need it, and reheat quickly over the stove. Toss with pasta, vegetables, potatoes or anything that with a little saucy and cheesy to make it more scrumptious as you like.

The sauce is rich, creamy and made with oat milk, served with a lightly dressed green salad and some warmed ciabatta bread. It should be the perfect quick lunch or weeknight meal.

Vegan Spaghetti Alfredo/Bechamel Sauce~No Cashew

Ingredient: Serve 2-3

  • 180g Spaghetti, linguine, fettuccine or tagliatelle
  • 2-3 tbsp Frozen Pea or Edamame beans
  • 2 tbsp Olive oil, (or use 3 tbsp vegan butter)
  • 2 tbsp Plain flour
  • 1 1/2-2 cups Unsweetened oat milk
  • 3-4 tbsp Nutritional Yeast flakes
  • ¼ tsp nutmeg, optional
  • 2 tsp lemon juice
  • Pink sea salt and freshly ground black pepper to taste
  • 1 handful chopped fresh parsley or basil, garnish (I have fresh coriander only at the moment)

Instruction:

  • Cook the spaghetti in a large pan of lightly salted boiling water according to the packet instructions, until just tender.
  • Heat the olive oil or vegan butter in a large skillet on low heat. Stir in flour quickly and constantly with a whisk, or wooden spoon. Cook for 2 minutes.
  •  Gradually stir in the oat milk. Whisk quickly to dissolve any lumps as best as possible. Add extra milk or water if the sauce thickens too quickly, or you may remove the pan from the heat to whisk.
  • Continue cooking the sauce by adding the peas on low heat for 3-4 minutes. Remove from heat, and add 3 tablespoons of the nutritional yeast, nutmeg, and 2 teaspoons of lemon juice, salt and pepper to taste.
  • Drain the cooked spaghetti and add to the sauce. Toss gently to completely coat the pasta. Serve with fresh parsley or basil with the remaining yeast flakes.

Tips: You can also freeze the sauce for up to one month. Let it thaw overnight in the fridge before reheating on the stovetop or in the microwave.

Crispy Courgette Fritter

Like the other vegetable fritters, this one is full of all sorts of my favourite veggies but also includes my secret ingredient to make it super crispy, crunchy and scrumptious!

It hasn’t any recipe to follow and doesn’t need any scale. You may use your favourite veggies. I just pick most vegetables from our garden, like courgette, potatoes, spinach and some bell pepper leaves. Only carrots and cabbages are bought from the supermarket.

All you need to do is finely shredded or grated them. Put the finely grated carrots with the shredded cabbages in the mixing bowl, sprinkle a teaspoon of salt, mix and leave it for half an hour or so to let it soften, then squeeze all the liquid out as possible. Grate the potatoes and also need to squeeze the liquid, mix with the carrots, cabbages and potatoes together, add in the seasoning of salt and pepper, and some ground cumin, dried parsley or fresh chopped one. If you don’t like parsley, use the coriander should be fine. Then add in just enough flour to bind everything together. Mix and shape into flat fritters and coat with coarse cornmeal (this is my secret ingredient to make the fritters so crispy!)
Fry in enough oil until both sides are golden brown.

DELICIOUS! ☺️

TIPS:

To make the fritters thinner, you will get crispier, and also quicker to fry.

You may use gluten-free flour instead of the normal plain flour if necessary, I tried to use chickpea flour before, but it still works so well.

Vegan Spicy Chorizo Spaghetti with Chilli Oil

I just am aware of, I haven’t been posting for a month, time flying too fast when you’re too busy with work. I still make my own 3 meals a day: breakfast, lunch and dinner. But all of them are just simple & quick. I think a lot of you would be in the same situation as me.

This is a super easy and not too time-consuming meal. You can use your favourite pasta like linguine, rigatoni, farfalle, etc. Or you can use tortelloni for a special dish! I have bought a pack of fresh Black Tuscany kale, you may use curly kale, spinach or other seasonal veggies!

Ingredient: Serve 2

  • 100g Spaghetti
  • Salt
  • 1 tbsp olive oil to fry the chorizo
  • Pinch of chilli flakes, more or less for your liking
  • 1/2 pack Fresh Black Tuscany kale
  • 2-3 Vegan Spicy Chorizo Sausages, sliced
  • Pasta water
  • Nutritional yeast flakes for topping or Vegan Parmesan, optional
  • 1 tbsp Extra virgin olive oil for topping
  • Sea salt and cracked pepper

Instruction:

  1. Remove the tough stalks from the kale, chop and rinse with water. Set aside.
  2. Boil water in a saucepan, and add 1/2 tbsp salt. Cook pasta until al dente. Reserve 1 cup of pasta water. 
  3. In a large pan, heat olive oil and chilli flakes over medium-high heat. Add sliced chorizo and fry for a minute. Add chopped kales and fry for another minute. Add a splash of pasta water to get things moving and to help steam the kales. Cook for another two minutes to wait for the kale to soften. 
  4. Season with salt and pepper. Toss in pasta and lightly toss into the veggies. Add in the remaining a splash of pasta water to emulsify. Grate Parmesan cheese and toss again if you use it. Check for seasoning, top with yeast flakes and more extra virgin oil and serve immediately.
  5. Enjoy!

Vegan Sourdough Discard Banana cake

I do feeding my sourdough starter regularly and saving me some sourdough discard to make this super easy cake for my hubby’s afternoon tea today.

If you have your sourdough starter, what will you do with your discard starter? Share with me more ideas if you don’t mind, please!

You can add your sourdough starter and discard up to 250g if you have, but reducing the flour to 1 cup should be enough. Because I have a 150g discarded starter, I decided to add 1/2 cup of flour to balance the cake batter. Also, you can add the sugar from 1/3 to 1/2 cup for your sweet tooth, I just use 1/3 cup of sugar that’s enough for me! Feel free to adjust your sweetness.

The way to achieve this cake shouldn’t be complicated for anyone. You only need one bowl, first of all, mash up the bananas straight in the mixing bowl, top with starter discard, oil, then sugar, stir to well combine. Then sieve in all the dry ingredients and chopped nuts, remember to reserve some nuts for topping. At last, place in the preheated oven to bake until cooked and golden brown. Isn’t that easy? This recipe is the easiest for the green baker!

Other vegan cakes in this blog you may like:

1 Bowl Vegan Banana & Chocolate Cake,

Vegan Mango Cheesecake, NO-Baked,

Vegan Carrot Cupcakes 2021,

One Bowl Vegan Apple Streusel Cake,

No-Baked Vegan Oreo Cheese Cake,

Vegan Banana Pancake ~ Happy Pancake Day.

Vegan Sourdough Discard Banana cake

Ingredients:
2 to 3 Spotty bananas, mashed well (I used 2)
150g Sourdough starter discard (can use room temp or from the fridge)
3 tbsp Vegetable oil
1/3-1/2 cup, packed brown sugar
1 1/2 cup plain flour
1 tsp baking powder
1/2 tsp baking soda
A pinch of Pink salt
A handful of chopped nuts, reserve some for topping

Instruction:

1.) Mash the ripened bananas and stir in the sourdough discard, oil and brown sugar. Mix all well to combine. Sieve in all dry ingredients and chopped nuts. Use a spatula to fold altogether without any dry flour.

2.) Pour in a lined loaf tin, pour the cake batter in evenly, top with the reserved nuts, place in the air-fryer and set the temperature to 160C, bake for 10 minutes first, then cover with a piece of foil, continue to bake for another 20 minutes until cooked.

Note: If using the normal oven, preheat the temperature to 180C/ 160C for a fan oven, and bake the cake for 28-30mins.

Vegan EXTRA Crispy English Muffin

See more photos on my IG: https://www.instagram.com/machamochimoo/

Once you’ve made your own English muffins, you’ll never want to buy them again. That’s what Paul Hollywood said.

I totally agree after I made these extra crispy English muffins. They’re soft inside, so crispy outside. The tips to achieve this result: first of all, your dough needs to be proof until triple or at least double the size; second tips, use a good oil to fry, like organic oil to get the nice colour and crispier.

If people said muffin, you must think that must be a little sweet sponge cake. Some people will be wondering: English muffin is a cake or bread? According to a google search, the English muffin is a flat yeast-leavened bread that is commonly sliced horizontally, English muffin is an essential ingredient and a variety of breakfast items are derived from it, such as the popular McMuffin. But it has to distinguish them from the sweeter cupcake-like muffins.

For making a quick dairy English muffin in a couple of hours, here is the link from Paul Hollywood (one of my favourite bakers) I suggest to you.

The tips to make this softer, you only need to prepare a Biga starter after your dinner. Mix up the dough and let the fermentation process in the fridge for a night. And the next day, just like the normal way to make bread. And the way to make this bread extra crispy, you don’t need to bake it in the oven, just heat up a griddle or frying pan, add your chosen oil and fry until both sides are golden and crispy.

They will keep in an airtight container for 2 days, but I would think you’ll finish them as soon as possible in your breakfast, pack lunch or even your tea time with peanut butter with jam!

I wish you had a go, these English muffins are extremely scrumptious! Once you try it, you won’t go back to the supermarket to get your muffins. Furthermore, they’re totally easy to handle!

More ideas to serve with your English Muffins:

  • For savoury ideas: Florentine muffins, Egg or Just egg muffins with melted vegan cheese, muffins with hummus & tomato, Portobello mushroom with roasted red peppers & balsamic glaze, use any pizza toppings and grill before serving.
  • Sweet tooth ideas: English muffins into French toast, strawberries with vegan cream cheese.

INGREDIENTS FOR THE BIGA:

60ml Water
75g Strong flour/bread flour
3/4tsp Instant yeast

FOR THE MAIN DOUGH:-

500g Plain flour/all-purpose flour
3/4 (3g) tsp Instant yeast
285-300g Water
1 tbsp Olive oil
6g Pink Sea salt

FOR THE TOPPING:-

5 tbsp Organic Rapeseed oil or Clarified butter or ghee for non-vegan
35g Polenta or Cornmeal, semolina

INSTRUCTION:

1). Mix all the Biga ingredients into a dough-like, leave at room temperature for 30 minutes, then chill in the fridge to do the fermentation for around 8-12 hours.

2). For the main dough: Add the ready Biga with the main ingredients in a bread machine, and let it work to finish the kneading process is. Lightly grease a large bowl with oil. Place the dough in the oiled bowl, cover and leave to prove for about one hour or more, or until triple in size in a warm place around 25-27C.

3). Dust the work surface with semolina or polenta. Tip the dough out onto the table, deflate and divide it into certain portions, and roll it into a ball shape. Leave for 15 minutes. Roll out to about 2.5cm thick. Spray the top and bottom side with water, and dust the semolina or polenta evenly. Place them evenly spaced apart on a large baking tray. Leave to prove for another 45 minutes or more in a warm place around 30C until double its size. (The longer you leave your dough before baking, the more bubbles you will create an even better flavour.)

4). Preheat the hot griddle or a heavy-based frying pan on the hob to very low heat. Griddle the muffins for approximately 5-6 minutes, then flip over and griddle for another 5-6 minutes on the other side until crispy golden colour.

5). Cut the muffins in lengthways, and serve with your favourite fillings. Any left-over can save in an airtight container for 2-3 days. Reheat in a hot griddle to make it crispy again for the best serving. Enjoy!

Vegan Irish Stew ~ Happy St.Patrick’s Day

I am not a fan to celebrate any special day for me, but I love to do this for people who like to celebrate St Patrick’s Day with classic vegan Irish stew – it’s big on flavour, alternatively bigger if you make it ahead and quite literally.

Traditionally, an Irish stew with Guinness is made with lamb, which you can totally do. My version is vegan, and I like to use soy chunks/ TVP, but you may use meaty-like king oyster mushrooms instead. Whichever you choose, this stew is absolutely delicious. Not too heavy, but still extremely filling. It’s great for St. Patrick’s day to enjoy with your family or friends. Great for this cold winter night.

Ingredient:

  • 2-3 King oyster mushrooms (cut chunky dice) or 1 cup soy chunks or TVP chunks
  • ¼ cup all-purpose flour (You can use gluten-free)
  • 2 medium potatoes, chunky dice
  • 1 cup chunky diced Butternut squash or pumpkin
  • 2 sticks celery, sliced
  • 1 Large carrots, sliced
  • 6-8 mushrooms, quartered
  • 1/2 can Black beans, optional
  • 1/2 can Guinness draught stout
  • 2 cups Vegetable stock
  • 1-2 tsp Mixed herbs
  • Small bunch of fresh coriander, chopped
  • Salt & Black Pepper

Method:

1.> Mix the flour with salt and pepper and half the herbs. Dredge the king oyster mushroom chunks in the flour. Shake off any excess flour with a sieve. Or soak the soy chunks in warm water until soft, squeeze the liquid out, add some soy sauce, sesame oil, white pepper & a little bit of salt, 1 tbsp of cornflour, stir to well combined, marinate it for half-hour. Then dredge it in the flour with the salt & pepper and half the mixed herbs.

2.> Heat up a large frying pan with 2 tbsp of vegetable oil, brown the King oyster mushrooms or soy chunks in a single layer, being careful not to crowd them. Remove them to a dish lined with a paper towel and set them aside.

3.> Add one tbsp oil to the frying pan, add carrot, celery, mushroom, potato and butternut squash. Season with salt and pepper. Saute, stirring frequently, over medium heat until softened and about 5-6 minutes. Add the remaining flour if left from the soy chunks, stir to mix. Add the Guinness, cook and bring to a boil. Add the remaining half herbs with the fried mushroom or soy chunks, and the vegetable stock, more or less by your judgement.

4.> Bring it to a boil again, reduce heat and let it simmer with a lid on, cook for a further time until the vegetables are very tender and the flavours have melded together. I love to make my stew thicker, but you can make it soupy like. Add seasoning to taste, suggest you add a knob of butter for a richer flavour.

5.> Serve hot with your Irish soda bread is the best or boiled rice for your choice.

Vegan Orange & Chocolate Pancake

Happy Pancake’s Day!

Wish you all have fun with your flapping skill! But I don’t, I always make a mess with my pancakes, unfortunately!

I haven’t put on any new post for two months since the last one. Such stress, hectic and depress difficult time I have been through. I wish everything gets better!

Orange and chocolate pancakes to cheer up for all. The batter is so easy to whisk up, ingredients can find in your cupboard easily.

Let’s start!

Vegan Orange & Chocolate Pancake

Ingredient:

  • 2 Oranges, rind and juice, reserve 1/2 of the orange juice to make sauce
  • 20g Dairy-free chocolate chips
  • 120g Plain flour
  • 3/4 tsp Baking powder
  • Pinch of sea salt
  • 1 tbsp Light brown sugar or maple syrup
  • 1 1/2 tbsp Rapeseed oil
  • (1/2 of the orange juice from above + dairy-free milk) = 150ml

Method:

1). Whisk the flour, baking powder, salt and sugar together. Pour in the milk, oil, and 1/2 of the orange juice, mix well combined until smooth. Fold in the chocolate chips. Set aside for 10-20 minutes.

2). Heat a tablespoon of oil in a frying pan, spoon about 2 tbsp of the batter at a time. Let the surface of the pancake appears lot of bubbles then flip. Wait both sides are golden in colour, remove and transfer to a plate and cover with a tea towel to keep warm!

3). Cook the remaining orange juice with 1 tbsp brown sugar or without, make a thickening sauces with 1/2 tbsp cornflour with 3/4 tbsp water. Whisk in the boiling juice, off heat.

4). Served the pancakes with some chocolate chips if you like and pour the orange juice over, maybe a drizzle of maple syrup or a scoop of your favourite dairy-free ice cream on the side. Enjoy!

Sourdough Orange Cinnamon Christmas Rolls

Hi everyone! Happy Christmas to you all! Wish all have a wonderful festival time and play safe!

I have been so busy to experiment making Panettones since December, they are great to try out a few of the recipes. Most of them are dairy for my family to try. The result was not too bad, the latest one took me 4 days to finish (because the weather so cold), the taste was rich and the texture so spongy and moist. But the downside is: it took me so much time to look after it. I still desperately love to make a sourdough vegan Panettone for myself. I wish I had time to make it.

Continue reading

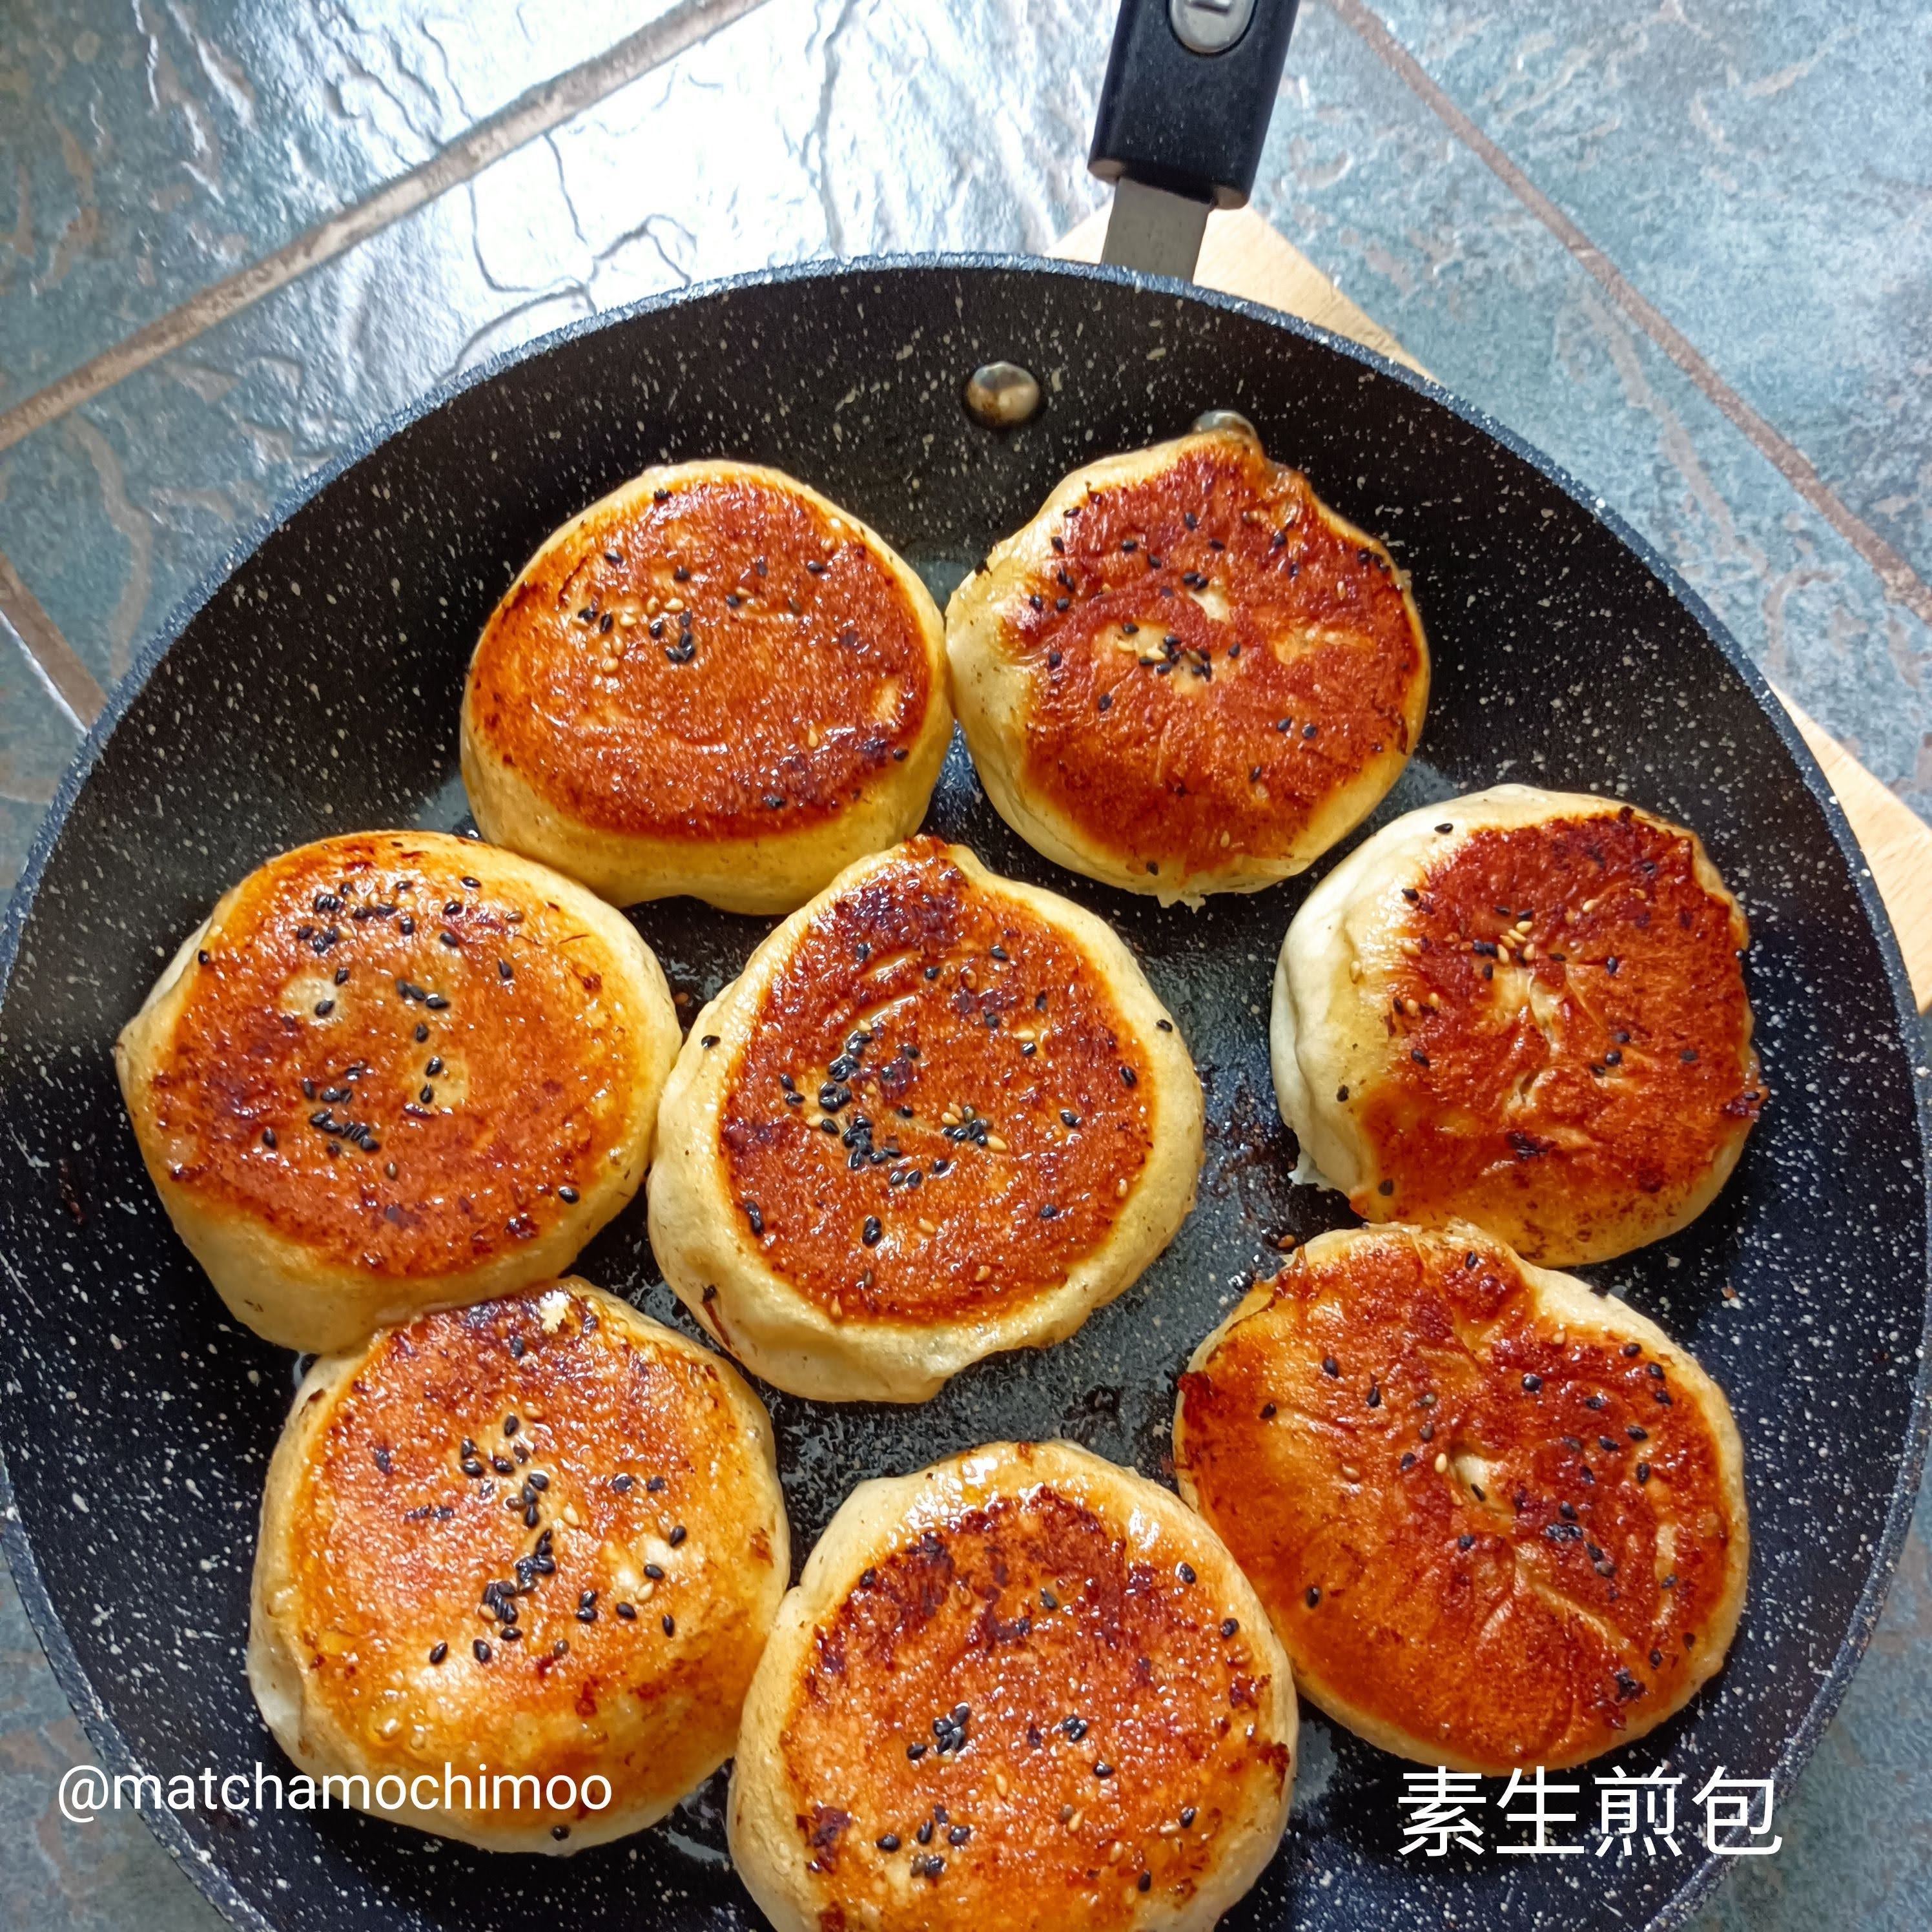
Crispy Pan-Fried Veggie Buns 素生煎包

Crispy on the outside, juicy inside and stuffed with sautéed cabbages, tofu, shredded carrot, mushroom or more, and seasoned with salt, toasted sesame oil and ground white pepper. These crispy bottom veggie buns are absolutely delicious, and tasty. The other name is called Shanghai Sheng Jian Bao 上海生煎包!

Sheng Jian Bao/生煎包 (aka Sheng Jian Mantou/生煎饅頭) is a type of Chinese pan-fried bao buns. It is made from yeast dough and originally filled with minced pork, spring onion and various seasonings. Its size is small, similar to a golf ball! In Shanghai, these buns are traditionally served as breakfast, they are popular in street stalls. People are queueing in front of the stalls starring at a large flat pan cover with lots of Sheng Jian bao frying. They are truly fresh and super flavoursome!

This flour ratio is my best recipe and I adapted it all the time to make Chinese buns. You may adjust the water content for the different flour you used.

Other similar Chinees buns recipes:
Vegan Pan-Fried Minced Bun ~ 素火腿梅菜包
Pan-fried Vegan Chinese Radish Buns
Chinese Steamed Hot Dog Bun & Char Siu Bao ~ Vegan 素叉燒包,熱狗包
Vegan Steamed Rose Bun ~ Man Tou 饅頭
Pan-Fried Vegan Custard Buns
Steamed Black and White Bun ~ Man Tao (雙色饅頭)

Crispy Pan-Fried Veggie Buns 素生煎包

INGREDIENT: (make 16 buns)

* 500G Plain flour
* 5g Instant yeast
* 1 tbsp Maple syrup or sugar
* 2g Sea salt
* 250g-260g Water
* 1 tbsp Oil, optional to make it oil-free

FILLING:
* 1 tbsp Neutral oil
* 1/4 Head of White cabbage, shredded
* 1 Carrot, grated
* 1 Courgette/zucchine, grated
* Few Mushrooms, sliced
* 2 tsp Grated ginger
* Small bunch of fresh Coriander, chopped
* 1 tbsp Chilli paste, hot or mild of your choice
* 1 tbsp Soy sauce
* 1 tbsp Flax seeds + 3 tbsp water, stir to mix, set aside, check note
* Salt and white pepper
* 1 tbsp sesame oil

METHOD:

1) Making the dough: Add water, maple syrup or sugar, yeast in a bread machine, then add the flour and salt. Choose the dough setting and start to work until all the ingredients come together and form a rough dough, add the oil and work to the end of the programme finish.

(Or you may knead it by hands: In a large bowl, mix flour, yeast and sugar. Pour in water little by a little while stirring with a pair of chopsticks.
Then knead with your hand until a smooth, elastic dough forms. Cover the bowl with a wet kitchen towel.
Leave to rise in a warm place until double in size. It will take between 40 minutes to 1.5 hours depending on the room temperature.)

*2) Turn the dough onto a floured surface, and knead for a few more minutes until smooth. Let the dough proof until double the size, it takes around an hour or more, depending on the temperature.

*3) For the filling: Put the cabbage, carrot, courgette in a mixing bowl, add 1 tbsp salt and rub thoughtfully with all, leave for an hour, squeeze the liquid out.

*4) Heat oil in a pan. Sauté ginger, mushrooms until fragrant. Add the cabbage mixture, soy sauce, salt and white pepper, chilli paste, and cook for 2 minutes, off heat. Transfer the mixture into a bowl. Then add along with flax ‘egg’ mixture and a drizzle of sesame oil.⁣ Set aside.

*5) To make the buns, turn the dough onto a floured surface and punch down to deflate. Divide the dough into 16 pieces about 50g each, roll each one into a ball. Take one of them and flatten it slightly with your palm. Use a rolling pin and roll out to a flat circle, thicker in the middle. Put a tablespoon of filling on top and pleat dough to seal tightly. Add half a tablespoon of oil in a large flat-bottom frying pan, put the buns in (about eight in a 28cm pan), with a gap between. Cover with a lid and leave for around half-hour until you touch the buns and feel fluffy.

*6) Cooking the buns over medium heat and fry for one or two minutes until the bottom turns light brown. You can flip over the buns and fry the other side if you like, otherwise, you can just fry only one side is fine. Slowly add in hot water to cover about 1/4 of the buns, put the lid on and turn the heat to medium-low. Cook until all water has been absorbed. Take out the buns and repeat for the remaining ones.

NOTE:

*You can freeze the cooked buns and just reheat in the pan, or steam them! No need to thaw.

*Add the flax ‘egg’ is for bringing all the filling stick together, you may skip this if you don’t like it.

1 Bowl Vegan Banana & Chocolate Cake

Vegan Chocolate & Banana Cake

I can’t remember how long I haven’t made banana cake, luckily my hubby bought a bunch of ripened bananas on the bargain shelf for me. They smell so nice and full of black spots on the skin, I think it is the best time to make this cake today.

Even you’re the first time to bake, this recipe is super easy, not many tools and no complicated ingredients to prepare, only need a mixing bowl and a spatula and a baking tin, so simple! The main ingredient need 2 bananas, chocolate and some slivered almond (some toasted for topping, some of the cake), and I sprinkle some desiccated coconut on top of the cake for decoration, but you can skip if you don’t have it. Because my banana is well ripened and I like my cake not too sweet, so the sweetness you can adjust!

Ok, let’s start! First, mash the bananas in the mixing bowl, add sugar, vegetable oil, nut milk, chop some dark chocolate, some slivered almond or chopped almond, stir to mix all. Sieve in the flour and use a spatula mix until well combined without any flour lumps left. Pour into the baking pan and bake! EASY!!!

1 Bowl Vegan Banana & Chocolate Cake

INGREDIENT: (6″ cake)

  • 2 bananas, ripened
  • 20g Brown sugar or maple syrup*
  • 50g Vegetable oil
  • 65g Nut milk of your choice
  • 50g Dairy-free dark chocolate, chopped
  • 3 1/2 tbsp ground almonds or hazelnuts
  • 150g Plain flour
  • 1 1/2 tsp Baking powder

FOR THE TOPPING:

  • 80-100g Dairy-free dark chocolate
  • 1 tbsp Vegan butter
  • Slivered almond or chopped hazelnut, optional

METHOD:

*1) Preheat the oven to 350F, 180C or 160C in a fan oven, grease one 6″ cake tin with baking paper.

*2) Mash the bananas in the mixing bowl, add sugar or maple syrup, then add the oil and nut milk of your choice. Stir until well combined. Add the chopped chocolate and ground nuts, sieve in the flour and baking powder. Mix all with a spatula until without any flour lumps. Pour in the cake tin. Bake in the hot oven for 30 minutes to a golden brown. Cool on a wire rack.

*3) Chop the chocolate into small pieces in a small bowl with the butter, and place over a pan of simmering hot water until the chocolate melted (don’t let the chocolate bowl touch the hot water). Stir the chocolate with the butter to a smooth paste.

*4) Spread the chocolate all over the cake and sprinkle the nuts on top. Then serve with a cup of your favourite coffee, ENJOY!

NOTE:

  • The sweetness of sugar you can adjust because I don’t like too sweet.